
Manufactured Home Installation Process Guide
Table of Contents
- What the Manufactured Home Installation Process Actually Involves
- Manufactured Home Site Preparation: From Raw Land to Buildable Site
- Permits, Inspections, and Who Is Responsible for What
- Foundation, Piers, and Anchoring: Getting the Support System Right
- Utility Hookups: Water, Sewer, Electrical, and Gas Connections
- Home Delivery, Crane Access, and Multi-Section Placement
- Manufactured Home Installation Cost: What Drives the Final Number
- Manufactured Home Installation Timeline: Dependencies and Weather Delays
- Manufactured Home Setup Checklist
- Frequently Asked Questions
Last Updated: October 12, 2026
What the Manufactured Home Installation Process Actually Involves
The manufactured home installation process is the sequence of site work, permitting, foundation setup, utility connection, delivery, and final inspection that turns a factory-built house into a permanent, code-compliant residence on your land.
Here’s the reality: a manufactured home arrives 90% finished, then spends its first weeks on your lot getting the other 10% right.
Below, we break down each stage, who handles it, and where installations typically go sideways.
Manufactured Home Site Preparation: From Raw Land to Buildable Site
Site preparation is the work that makes raw land ready to receive a home: clearing, grading, drainage, and confirming the lot can legally hold a structure. Skip it and everything downstream costs more.
Land clearing, grading, and drainage
Clearing removes trees, brush, and debris from the footprint and the access path. Grading levels the pad so the home sits on stable, compacted ground.
A common mistake is grading only the home’s footprint and ignoring how water moves across the whole lot. Slope the pad away from the structure and plan where runoff goes before delivery day, not after.
Zoning, deed restrictions, and community rules
Not every lot can legally hold a manufactured home. Zoning codes, deed restrictions, and community rules can each block a project on their own.
- Zoning: confirms manufactured housing is permitted and sets minimum lot size and setback lines
- Deed restrictions: private covenants that may require a specific foundation type or ban manufactured homes outright
- Community rules: HOA or park requirements covering appearance, skirting, and placement
Check all three before you buy land. A buildable-looking lot with the wrong zoning is an expensive lesson.
Permits, Inspections, and Who Is Responsible for What
Permits and inspections are handled at the local level, and responsibility splits between you, your dealer, your installer, and utility providers. No single party owns the whole process.
Typically, the homeowner pulls or signs off on permits, the retailer coordinates delivery and setup, a licensed installer handles foundation and anchoring, and utility companies manage their own connections. Some jurisdictions require a licensed contractor for specific steps.
Assuming the dealer handles every permit is the most common and costly mistake. Permit requirements vary by county and state, and unpermitted work can force a tear-out or block your certificate of occupancy.
Confirm in writing who files what before work starts, and keep every inspection sign-off in one folder.
Foundation, Piers, and Anchoring: Getting the Support System Right
The support system is the foundation, piers, and anchoring that hold the home level and secure it against wind and ground movement. This is where installation quality is won or lost.
Foundation type depends on your site and local code. Common options include:
- Pier and beam: concrete or steel piers on footings, adjustable for leveling
- Permanent foundation: a concrete perimeter or slab, often required where site-built standards apply
- Anchoring and tie-downs: straps and anchors that secure the home to the ground per local wind requirements
Leveling and anchoring must follow the manufacturer’s installation instructions and local code. A home that’s out of level stresses its frame; a home that’s under-anchored is a safety risk.
Utility Hookups: Water, Sewer, Electrical, and Gas Connections
Utility hookups connect the home to water, sewer or septic, electricity, and gas. Each has its own permit, inspection, and provider, which is why this stage drives so much of the timeline.
Here’s how the connections usually break down:
| Utility | Typical Connection | Who Coordinates |
|---|---|---|
| Water | Municipal line or private well | Homeowner plus local provider |
| Sewer | Municipal sewer or septic system | Homeowner plus health department for septic |
| Electrical | Meter, panel, and service line | Licensed electrician and utility |
| Gas | Propane tank or natural gas line | Licensed plumber and supplier |
Septic systems add a layer of permitting and inspection that municipal sewer doesn’t. In many rural areas, the health department must approve the system before you can connect.
Schedule utility providers early. In many areas, the wait for a meter set or inspection slot is longer than the installation itself, and everything stalls until it’s done.
Home Delivery, Crane Access, and Multi-Section Placement
Delivery is the day the home arrives on a transporter and gets set on its support system.
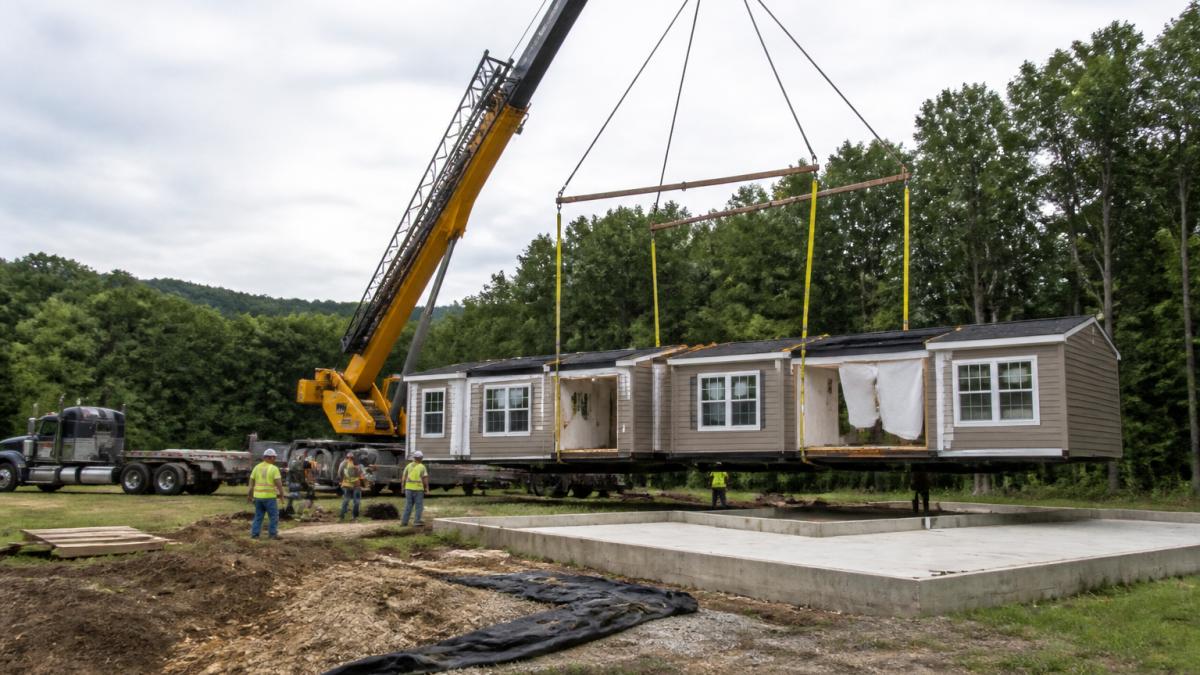
Before delivery, confirm the route can handle the transporter and that the site has room for the truck and any crane.
Site access is the hidden constraint. Narrow roads, low branches, soft ground, and tight turns can all require a crane or a different delivery plan.
Manufactured Home Installation Cost: What Drives the Final Number
Installation cost depends on your site, foundation type, utility distances, and local labor, so no single figure fits every project. What separates a predictable budget from a runaway one is knowing which stage each dollar lands in and which stages are most likely to surprise you.
Cost by installation stage
Think of installation as six cost buckets, each with its own drivers:
| Stage | What you’re paying for | What moves the number most |
|---|---|---|
| Site work | Clearing, grading, drainage, driveway and access pad | Raw or wooded lots, rock, soft soil, long driveways |
| Permits and engineering | Local permit fees, plan review, foundation engineering, septic approval | Jurisdiction fee schedules, whether engineered drawings are required |
| Foundation and support | Footings, piers, perimeter or slab, anchoring and tie-downs | Pier-and-beam vs. permanent foundation, frost depth, wind zone |
| Transportation and placement | Transporter, route permits, crane or roll-off, crew time | Distance from the factory, escort requirements, crane size and hours |
| Utility connections | Trenching, meter sets, service lines, septic or sewer tap | Distance to the street, whether a well or septic is needed |
| Finishing and closeout | Skirting, steps, marriage-line finish, final inspection, touch-ups | Trim level, deck or porch additions, punch-list scope |
The variables that actually swing the total
- Site condition. A flat, cleared lot with utilities at the street is the low end of every bucket. A wooded slope with no services pushes site work, foundation, and utility runs up at the same time.
- Foundation type. Pier-and-beam is generally the least expensive support system. A permanent foundation, often required where site-built standards apply or where a lender insists on it, adds concrete, engineering, and inspection cost.
- Utility distance. Cost scales with trench length and the number of trades involved. A septic system adds permitting and health-department approval that municipal sewer does not.
How to get a number you can trust
Ask every installer for an itemized estimate by stage, not a single lump sum. A stage-by-stage quote lets you see which buckets are fixed, which are allowances, and which are contingent on site conditions discovered during work. Compare quotes bucket by bucket rather than on the bottom line alone, the cheapest total often hides the largest allowances.
Beware of any quote that bundles site work, foundation, and utilities into one line. When a surprise appears, rock, a failed perk test, a longer trench, you have no way to tell whether the added charge is reasonable. Itemization is your only leverage.
Budget a contingency on top of the itemized total. Site work and utility runs are the two stages most likely to exceed the estimate once ground is broken, and both are hard to reverse once started.
Current pricing for Patriot Homes models is available on our website.
Manufactured Home Installation Timeline: Dependencies and Weather Delays
A typical installation runs from a few weeks to a few months, and the timeline is driven by dependencies, not the home itself. Permits, utility scheduling, and weather each gate the next step, and because the stages are sequential, one late approval or utility slot pushes everything behind it.
Stage-by-stage schedule and what gates each step
| Stage | Typical duration | What gates it |
|---|---|---|
| Permits and approvals | Weeks to a few months | Local review queues, engineering sign-off, septic or health-department approval |
| Site prep | Days to a couple of weeks | Weather, equipment availability, site condition |
| Foundation and support | Days to a few weeks | Concrete cure time, inspection scheduling, frost or ground conditions |
| Delivery and placement | One to a few days | Transporter scheduling, route permits, crane availability, site access |
| Utility hookups | Days to several weeks | Provider scheduling, trenching, meter set, inspection slots |
| Final inspection and walkthrough | Days | Inspector availability, punch-list completion |
The dependency chain
The stages don’t overlap much. Permits must clear before site work can be signed off. Site work must finish before the foundation goes in. The foundation must cure and pass inspection before the home can be set. Utilities must be roughed in before the final inspection. Each link waits on the one before it, so the total is the sum of the stages plus the waits between them.
That’s why the two biggest schedule risks aren’t on the construction side at all:
- Permit queues. Local review and health-department approval for septic are the most common front-end delays. Front-load these before you schedule anything else.
- Utility scheduling. The wait for a meter set or an inspection slot frequently exceeds the installation work itself. Book providers as soon as permits clear.
Weather and seasonal delays
Weather hits the stages that depend on open ground and curing concrete:
- Site work stops when rain saturates the pad or frozen ground blocks grading.
- Foundation work slows when temperatures drop below what concrete needs to cure properly.
- Delivery can be rescheduled when soft ground won’t support the transporter or crane.
Build slack into the schedule, especially in winter or a wet season. A week of buffer between site work and foundation, and between foundation and delivery, absorbs most weather shocks without cascading.
How to compress the timeline
- Front-load permits and engineering before you commit to a delivery date.
- Pre-schedule utility providers the moment permits clear, not after the home is set.
- Confirm access and crane needs early so a delivery reschedule doesn’t reset the whole chain.
The installation timeline is a chain of dependencies. One late permit or utility slot delays everything after it, so front-load approvals and scheduling, and treat the waits between stages, not the stages themselves, as the real schedule risk.
Manufactured Home Setup Checklist
Use this checklist to track your project from land to move-in:
- Confirm zoning, deed restrictions, and community rules allow the home
- Verify the lot is buildable and accessible
- Complete land clearing, grading, and drainage
Frequently Asked Questions
What are the steps involved in installing a manufactured home?
The manufactured home installation process follows a set sequence: confirm the site is buildable, clear and grade the land, pull permits, prepare the foundation and piers, run utility hookups, deliver and set the home, join multi-sections, anchor and level it, complete the final walkthrough, and document everything. Each step depends on the one before it, so delays in site prep or permits push back delivery. Working with your dealer and installer to map the timeline early keeps the process on track.
How much does it cost to put a manufactured home on land?
Manufactured home installation cost depends on site conditions, foundation type, utility distances, and local permit fees. Remote lots or sloped terrain need more grading and longer utility runs, both of which raise the total. Ask your dealer for a line-item estimate that separates site prep, foundation, delivery, utility hookups, and permits so you can see where the money goes. Current pricing for Patriot Homes models is available on our website.
How long does manufactured home installation take?
The manufactured home installation timeline usually splits into two phases: site prep and delivery. Site prep, including clearing, grading, permits, and foundation work, often takes several weeks to a few months depending on weather and inspections. Physical installation, including delivery, section joining, anchoring, and utility hookups, typically takes days to a few weeks. Rain, snow, or frozen ground can delay grading and delivery, so build buffer time into your schedule.
What site preparation is needed before a manufactured home is delivered?
Manufactured home site preparation includes clearing vegetation, grading the lot, confirming drainage away from the home, verifying zoning and deed restrictions, and preparing the foundation or pier system. The site also needs a clear path for the delivery truck and crane. If utilities are not already at the property, arrange water, sewer or septic, and electrical connections before the home arrives. A buildable site is the single biggest factor in a smooth installation.
Do I need permits to install a manufactured home on my property?
Yes, most jurisdictions require permits for manufactured home installation, foundation work, and utility connections. The exact requirements vary by state, county, and city, and some communities add their own rules on top. Your installer or dealer can often help identify which permits apply and who is responsible for pulling them. Keep copies of every approved permit and inspection sign-off, since lenders and future buyers may ask for them.
Who connects utilities to a manufactured home?
Utility hookups usually involve a licensed electrician, plumber, and sometimes the local utility company. The homeowner or general contractor coordinates these trades, while the installer handles the home-side connections. Water and sewer or septic lines, electrical service, and gas (if applicable) all need to meet local code. Confirm who is pulling each permit and scheduling each inspection before the home is set, so you are not waiting on utilities after delivery.
The installation process rewards preparation and punishes guesswork. If you own land and want a home that fits your budget and your layout, Patriot Homes builds customizable manufactured homes and guides you through every stage. Our team offers 24/7 support, a wide range of model options, and help personalizing your finishes so the home you set down is the home you actually wanted. Contact us now to start your build.